Wednesday, December 10, 2025

Creating Candy Cane Houses

Candy Cane House

When inspiration hits.

While making the small fall houses I accidentally left off the chimney


on one. I decided to make it into a Christmasy/winter version. I wanted the roof to be red with snow so I decided to used red and white stripes. Then I came up with the idea to use the candy cane theme. I added the peppermint charm to the front door hanger and painted on the candy cane by the door and under the windows. I love red and pink together so I added the pink front door and added the aquamint trees and other little details to match. I was pleased how it turned out so I decided I will be making more of these in the near future. I thought I would share the result of the candy cane house sample along with the other wintery/holiday themed pieces that I included in my shop restock last week. These have all been sold and shipped to their new homes. 

As soon as I finish the fall theme house I will be making the final version. While I know that the fall house is a little late for this fall and the candy cane house is a little late for Christmas this year, they will be ready to go for next year. And I think it would fit in nicely during Valentines Day, or all year! 

I have started a substack where I will be sharing more behind the scenes photos and stories. If you are interested in more, please follow me on Substack here: Beth Macre on Substack

Until next time, 

Beth


Wednesday, November 5, 2025

In the Studio this week

And just like that it is November! I'm not sure how October flew by so fast but here we are in the first week of November. I have been busy finishing a project for a local shop, filling a couple of Etsy orders (pet ornaments) and working on the Fall Themed tiny houses. Staying busy all day everyday makes the time fly by. 


I also had part of my clearance sale last weekend and it took me a few partial days of packing orders. I sold a few of the shadow box wood shelves and that took me a few days to finish packing. I don't normally pack orders in such big boxes so I had to find boxes that fit the variety of sizes I needed. I also added a coat of paint onto one of the shelves and added hangers on the back of one of the shelves. 

I had hoped to have another clearance sale this past weekend but I just didn't have time last week to prepare. I need to spend time working on the fall tiny houses so that is what I'm doing this week. I took photos of the all of the rainbow houses that I have for the next clearance sale. I plan to have that this weekend. I'm working on that in my spare time. During the daytime in the studio this week I am cutting clay for more houses and making tiny house charms. The hanging pumpkins, hanging hearts.

I'm also adjusting to the time change. My brain wants to stay on the old time schedule but my body says otherwise. I'm slowly adjusting. But I am enjoy the fall foliage in our area this week. I need to go for a drive to see what Northwest Arkansas Ozarks look like outside of my front yard. It won't last long so I need to enjoy it while I can! 


Until next time, have a great week! 


Friday, October 3, 2025

In the Studio - October

Finishing rainbow houses and letting go. 

I'm glazing the last batch of rainbow houses this week. I hope to get them all in the mail by the beginning of next week so I can move on to the next projects, my Fall House orders and preparing for my sample, seconds, and extras sale. 

What is a Sample, Seconds, and Extras sale? 

Samples: During the process of making large batches of themed houses and accessories to go with the houses, I create samples of my ideas. I always make sketches of my ideas and work out the details on paper. Then I make a sample to see how that idea works. Sometimes I decide that something doesn't look right so I make another sample and change up what I don't like. The original idea may be perfectly fine, but it's not the final version. So that ends up being a sample. Sometimes I keep samples but since my studio space is limited, I can't keep every sample. I have picked out some samples that I have


decided to part with. I will put those in my shop to clear out my studio to make room for new samples. 

Seconds: I always end up with pieces that have small flaws with the glaze, or small cracks, or maybe it just doesn't look like I expected it to. Those pieces are called seconds. Some seconds have major issues so I don't sell those. I keep them on my own display shelves in the studio or if it's really bad, I throw it away, which I hate to do. 

Extras: When making batches of houses or accessories, I usually make one or two extras just in case something breaks or turns into a Second. I usually put those extras on my shelves and enjoy them, or use them as props in photos. But after awhile, my studio starts to get overcrowded so I have to thin out. I really find it hard to do this but I have to remind myself to let others enjoy my work. 

In the photo you can see some of the items that I have picked out for the clearance sale. I plan to add more to the sale, but I need to go through my studio and make sure I gather everything that I can part with. And if any of these items do not get purchased in my sale, I will happily put them back on my display shelves to enjoy myself! If you see something that you would like to purchase, watch for an email in October with the exact date and time they will be available. 

Let me know what you think. 

Do you find it hard to let go of collections? 

Until next time, have a great weekend!


Saturday, September 20, 2025

Fall is Coming!

Fall Themed House Coming Soon!

I’m still working on the last batch of rainbow houses and hope to ship the rest out by the beginning of October, but I wanted to give an update and answer a few questions I have gotten about the fall themed house.


First let’s chat about the tiny houses and how I've changed the way I take orders over the last year. I started creating these tiny houses in 2024. Before that I mostly made bigger houses (Hearthomes) with a different style roof. I decided that I wanted to create these smaller houses in an attempt to be able to make more houses so more of my customers had the opportunity to order. I also wanted each themed house to be a little different than the rest of the tiny houses to make them part of a collection. Many of you started ordering these in July of last year when I started taking pre-orders of ‘subscription’ boxes. The first set was the Halloween set. I didn’t even have a sample to show you all before I took orders, but you guys ordered anyway! Thank you for that if you ordered that first set! I appreciate your trust in me! Most of you had purchased my Hearthomes before, or followed me on Instagram, so you trusted me to make something without even seeing the final product! But I know it helps to see what you’re ordering before you spend your hard-earned money. So, after that I have been trying to create samples before I start taking pre-orders. 


Last year I used the Halloween theme so this year I decided to make it a fall theme with the tiny pumpkin sign. I also made a tiny heart as an option to add on. I made this one a taller house and made the ‘front door’ on the narrow end to create a row house style of house/shop.

I’ve been working on sketches in the evenings and working on the current rainbow houses during the day. In my last blog post I shared the sketch of my idea. Last week I created my ‘first draft sample’. This past weekend I was able to fire and glaze the sample. I called it a draft because I usually change some details after I see what it looks like after it’s fired in the kiln but I’m pretty happy with how it turned out! 


So, this is my fall themed sample! I plan to make a couple more samples using a different color roof and give you roof color options when/if you place an order. I also added a little hanging pumpkin (or heart) by the door, to make it look like a tiny pumpkin shop sign (which gives me ideas for future tiny shops).


I created a fall option last year for my customers who did not want Halloween house. The majority of the orders were for the Halloween option.  


I had 2 options for the winter box. The red roof or the aquamint roof. I also added the option of adding the set of tree and a snowman. I love the accessories, but honestly, those are the things that take me so much longer! 

Let me know in the comments what you think about new fall house design! It fits in well with the rest of the tiny house collection. 


I’ve had a few questions about the tiny house pre-orders so I thought I would answer those questions here plus a few of questions that I thought some may have.

 Let me know if you have any additional questions! 


Q & A

Question:  Will you be taking pre-orders?

Answer:  Yes, I will be taking pre-orders for the Fall House from my website, but I will wait until I'm mostly finished with the rainbow houses. Hopefully by early October.  (Date TBD) 


Question: Will this be a subscription box pre-order?

No. This will be a one-time purchase. 

After I started working on orders for my first subscription box, I quickly realized fulfilling subscription boxes monthly, bi-monthly, and even quarterly would be difficult. It can take me awhile to finish orders. Especially when life gets busy! And my life became very busy about the time I took orders for that second box! But I love that many of you have continued to order these tiny houses and continue to add to your collections! I thought I would continue creating seasonally themed tiny houses, so you (my customers) have something different each time. 

Question: How will I know when/how to order?

Answer:  I will send out my newsletter to my email list with the date and time.

Sign up for my newsletter if you are interested in getting these updates. 


Question: Where can I place my Pre-Order?

Answer: Pre-orders will be taken from my website. 

There is a link at the top of this page. BethSMacre.com


Question: How long does it take to make and ship? 

Answer: 6-8 Weeks approximately. Maybe less. 

The pre-orders take me awhile to make but it depends how many orders I get. I usually make the houses in batches of 10-15 houses. (The clay starts to dry out too much if I try to make too many in a batch.) When I get a batch finished, I start shipping orders starting with the first orders. Then I make another batch, ship, then start the next batch, until I work my way down my list. 


Let me know if you have any other questions!

Thank you for following along with me! 


Wednesday, September 10, 2025

In the Studio this Week

Last week I spent most of my time glazing rainbow houses.  


I glazed some brights and pastel-colored houses. I am working my way through my list of orders. I will be shipping out some orders in the next few days. So if your order is in this batch, you will be getting a shipping notification soon. 


I also started cutting some clay blocks to make the next batch of rainbow houses and a few samples for the fall themed house. I hope to have a sample to share soon. We’ll see how much I can get done. I need to ship a dozen orders out first. 


I also worked on a batch of wholesale pig magnets for the local visitor center in Fayetteville. I need to make pig ornaments this week if I have a little time. I want to get those made and delivered before the next home Razorback game! I also make Arkansas shaped ornaments and magnets that are also sold in the Fayetteville Visitor Center in the square in downtown Fayetteville. I'm working on restocking those as well. 


So that’s all for this week. I have a lot of work to do!


Friday, August 29, 2025

In the studio

 In the Studio


August has been very hot, as usual, but the temperatures here in Arkansas have cooled down to a much more comfortable level this week. I seem to have more energy when the weather is nice so I am beginning to look forward to fall. I would say it's my favorite season but I love something about each season. 


What I’m working on…  

Little clay rainbow houses in bisque and glazed stage.

I shipped the first small batch of rainbow houses last week and finished making the next batch of houses to glaze. While those were drying, I have been sketching some ideas and thinking about plans for future projects.


I worked on some sketches for my next tiny house design. Last year I made Halloween themed tiny houses, and only a few fall themed houses, so I decided to go with fall this year. Many of my customers have become collectors so I want to make sure I offer a variety of themes for customers to collect. The photo below is my first sketch. I will make a couple of samples when I make another batch of rainbow houses. My priority right now is finishing the rainbow houses and hope to have enough time to get the fall houses made!


Pencil sketch of little clay house with fall design


Ready to Ship Sales

Since I started taking pre-orders for the tiny houses, I have not been having many ready to ship restocks. The pre-order system seems to allow for more of my customers to purchase a house, but it takes me quite a while to fill all of those orders, which doesn't leave much time to make extra houses. However, I do have some samples and some slightly imperfect pieces that I will probably put up for sale in the near future, so if you missed out on pre-orders, make sure you are following me on Instagram or signed up for my newsletter to get notified of the details when those events happen. 

Link to Instagram: Beth Macre on Instagram

Link to Newsletter Sign up. Newsletter Sign Up


Blog post updates

Also, check back here weekly if you are interested in finding out what I'm working on. There is a link at the top of my website, BethSMacre.com. (See photo below)


Screenshot of the menu on my website BethSMacre.com

I think email inboxes have become so full that many of us, me included, miss seeing the newsletters that get lost in the advertising emails. The social media algorithms don't always show us the accounts we want to see, so I thought that if I started blogging again, you can come to my website and catch up on what I'm doing, if you are interested. It won't disappear after 24 hours, it won't get lost in your emails, and it will be here as long as I am here. 

This blog dates back to before Instagram, Facebook, and all of the other sites that have come and gone. I originally started it to document what I was doing with my art while I was still teaching. I stopped blogging for awhile because social media kind of took over that goal. But time changes everything, so I thought I would get back to blogging and document what I'm working on again. I plan to create some long form videos for You Tube, but I'm still learning to create content that would be interesting to watch, and trying to figure out what I want to vlog about. I love to draw and paint and would love to do more of that and maybe create some drawing or painting how to videos. Working with clay is very difficult to video and my process with clay takes so long and would be kind boring to watch, in my opinion! Like watching grass grow. It is a slow process. 

So if you've made it this far, leave a comment below and let me know if you like to watch videos and what you would enjoy watching. I will share a link when I upload some video content. 


Until next time...


Thursday, July 17, 2025

Ceramic Rainbow Themed Houses

What I’m working on…

This month I took pre-orders for my tiny Rainbow themed houses. I made several samples to try out different details so I had some examples to show my email subscribers.

Here are photos of the samples that I made. Each one is a little different but I selected one style to make for the pre-orders. In the second photo, you can see the style I chose and the progress I’ve made so far. 

I am going on a trip with some friends this month so I will take a short break then start glazing these and begin another batch. I work in small batches because the clay starts to get a little hard if I let them sit (in an airtight container) too long. 


This batch has a dozen houses. I need to make the tiny hearts that hang from the chimneys but the houses are finished and drying. 

am currently using a white earthenware clay. This clay is gray while in its greenware stage. After it dries completely it will be fired in my little kiln and will turn white. It will then be ready to glaze and be fired again. I will post more photos when I get to that stage. 

Supplies used: 

Low fire earthenware clay, Nichrome 20 gauge wire, Mayco Stroke&coat glazes.


Affiliate Link

Nichrome wire : https://amzn.to/40svyno


Saturday, June 21, 2025


Hey friends! 

Welcome to my studio blog! I’ve decided to resurrect this blog to talk more in depth about what I’m working on, share some behind the scenes photos and videos, answer questions, and possibly have some small tutorial lessons for diy art projects. I’ve been wanting to have a place to create community with my Instagram and Facebook followers that can all come together in one space. 

Latest Rainbow House to come out of the kiln. 👉🏻

I’ve been on Instagram and Facebook for a long time but I’m limited on space and what I can do there so I decided to go back to my original online journaling space…the blog. I actually have two blogs. This one, Beth Macre Studio, since 2007, and my second one that I started in 2011, while I was still teaching high school art. I retired from teaching in 2012, so I didn’t post much on that blog after that. Just an occasional tutorial. But I want to add any tutorials that I may create over there on the Art Class blog. My plan is to also create some YouTube videos to enhance tutorials and demonstrations on projects I decide to share.  

There is a link at the top of this page to ‘Art Class’ or here is a direct link if you are interested in checking that one out. 

Mrs. Macre’s Art Class 👉🏻 https://macresartroom.blogspot.com/

Follow along if you are interested in what I’m working on and let me know what you would like to learn more about what I do. Leave a comment below. We’ll see where this goes. 

Until next time, 

Beth 🌈❤️🏠


Follow me on Instagram, Facebook, and YouTube (more coming on YT in the future). 


Wednesday, May 4, 2022

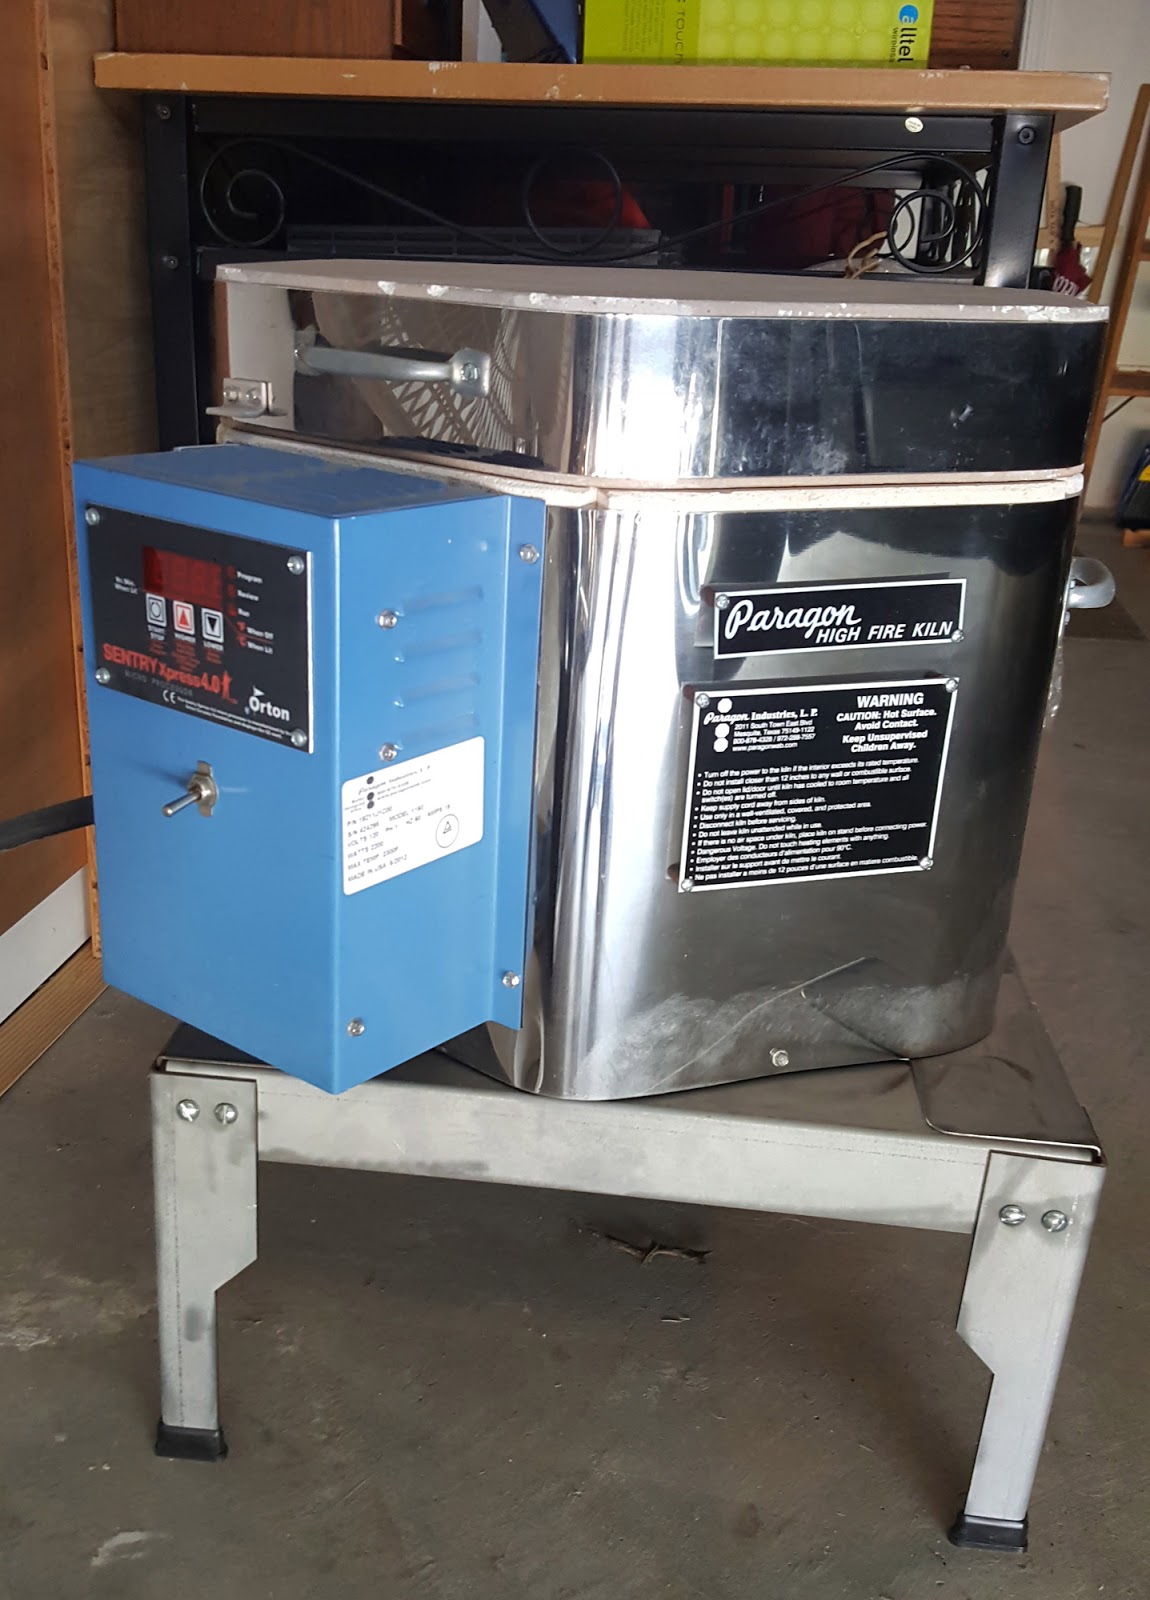
My Kiln


My Little Kiln

She is small but mighty. She gets the job done. 

The size of my kiln does limit what I can create, but I get a lot of use out of it. When I purchased this kiln, I planned to use it to fire my little clay houses and other accessories. So she has plenty of space for that plus more. I also use it to fire small bowls, ornaments, and other small items that I sell from my online shop. You can see how big it is inside in the photo below.


 There are many times that I wish that I had a larger kiln so I could fire larger things and fit more layers, but I can fill it with a variety of houses and accessories, as well as ornaments and bowls. If I am careful, I can get quite a few things in there and fire a load overnight. And because it is a small kiln, it really doesn't use a lot of electricity. A little larger one would be great to have, but this one works for me.


What I love the most about my little kiln is the automatic timer. After having this feature I could never go back to having to change the temperature manually. Well, I could, but I wouldn't want to! It is so easy to just set it in the evening and unload the kiln the next morning.

Type of Kiln
I use a Paragon Xpress with a kiln sitter.

I keep my little kiln in the garage. It only a requires 120V plug that we had an electrician add next to our electric panel in the garage.


Next Size Up:
I recently did a search for my model and apparently, this exact model is not available anymore. If you are in the market for a little kiln, look for ones that are 120V. But if I were going to purchase a new one, I would get the next size up. 
I just did a search for Paragon Kilns and the website where I purchased mine does not sell Paragon Brand any longer. But I did find one similar to mine on this website:
I have no affiliation with this company. I'm just sharing where to locate this style/size kiln. 

It is 240V, so you would need to have the proper wiring installed.
Obviously, you would want to do your research on the different sizes that are available, based on your needs.

Thanks for stopping by!


Beth

Sunday, March 18, 2018

Garden Markers for the Creative Gardener


Ceramic Plant Markers

Plant markers are a fun way to decorate your garden and to
mark your new or existing garden plants.
I've seen many different creative and fun styles of markers out of different materials. Some I've seen are made of stamped silver spoons, wooden spoons, and even tongue depressors! As an artist, I believe in decorating any space. Gardens are no exception!


I am a 'wannabe'  gardener, but since I work with clay I decided to make some plant markers for the garden I dream of.

My gardening has mostly involved flowers over the years, but herb and vegetable gardens are perfect little gardens for the pretty plant markers.

Veggies? Herbs? Flowers? Potted Plants?

Any herb, vegetable, or flower can be stamped into these plant markers. I have received orders for plants that I have never heard of, so it has been a learning experience for me! What are your favorite plants?

Update: I am not currently taking orders for the plant markers. 

Happy Spring Planting! 
Beth


Saturday, September 30, 2017

Painting a Pumpkin on Canvas

Decorating for Fall 

Fall is finally here. The days are getting shorter and the weather is cooling off. Now it is time to pull out the decorations for fall.

Decorating with Pumpkins

I love Fall decorations but I have to admit that I do not have many. The Fall season goes by so quickly. I love pumpkins and wanted to paint one or two onto a canvas to help my house look a little more like fall. I love the orange ones but I also love the white pumpkins (or gourds) too. I love how the white ones look with blue so I decided I would paint one with my favorite turquoise blue in the background. I had a 6"x 6" deep canvas so I used it because it can sit on a shelf.


DIY Pumpkin
I also decided to do a tutorial about how I painted it. If you are interested in seeing the tutorial and learning to paint one yourself, I shared the tutorial over on my Teaching blog here:

DIY Painting a Pumpkin on Canvas

FAST and FUN
I enjoyed spending an afternoon painting and I am pleased with how it turned out. I hope to paint more pumpkins in in the future different colors and shapes. I will post a link here when that happens.

Now I need to work on my decorating game and add more fall decor to the porch!

Happy Fall Y'all!


Friday, August 4, 2017

DIY Pencil Holder

Keeping the Pencils Organized


Do you have a lot of pens, pencils, markers? 

When you have a lot of art supplies, you need a system for keeping them organized. I have a lot of colored pencils. When I draw with my colored pencils, it is very important to know where I can find certain colors when I need them. I shared my system of keeping them organized a few years ago (here), but I thought I would share it again and offer a few of my tips.

Here is a photo of my colored pencils organized by colors in my handmade pencil holder.

I use my holder for my colored pencils, my Prismacolor Colored Pencils and I have a lot of them.  But this holder could be used for pencils, pens, markers, or paintbrushes, or a mixture of all of these. I should probably even make another holder to hold all of these items.


DIY Pencil Holder

Whatever your pencil or pen obsession is, you may face the same problem that I do.
How to keep them organized and easy to use.
A few years ago, I needed some way to keep my growing colored pencil collection organized. I had gone to a colored pencil workshop where the Instructor had made a holder for her colored pencils. I liked her idea, so I took her concept and made my version of it. Actually, I made two of them.


Small Pencil Holder
The art instructor's version is smaller than the one I made. Hers is great for individual projects, but I wanted mine to hold my entire collection of colored pencils. Or at least the ones that have been sharpened. Yes, I have that many pencils. She used smaller PVC pipe and a thinner, more lightweight, base piece of wood.

Her pencil holder would be great for keeping your pencils for one or two current projects organized. (If you use colored pencils, you probably understand that you may use 20 or 30 colors in one project.)
The smaller version could also be used to keep a variety of drawing tools.


The Large Pencil Holder DIY

Supplies for the Large Version

Cutting Tool - We used a table saw.

3 Inch PVC Pipe -  We bought 2 pieces and cut into five 4" pieces with an extra 2 1/2" piece.
Tip #1: Cut them short enough that the pencils will stick out of the top and tall enough to hold the pencils upright. I had one shorter extra piece that I placed on the end to hold short pencils.
Tip #2: Thanks to a reader tip, I have learned that the printed letters on the PVC pipe can be removed with fingernail polish!

One 8 ft. piece of 1x4 Lumber -  Cut into two pieces to the length that you want your holder to be.
Tip: You may want to place the cut pieces of pipe onto the board to see how many will fit then cut. I cut 2 pieces that fit on top of a bookshelf.  (I painted the board white to match the PVC pipe) You can cut as many strips as you need for your supplies.

E6000 Glue - Clear
Use the E6000 tube of glue to attach the pieces of pipe onto the pre-painted board.
Tip: I made sure the letters that are printed on the pipe was facing another pipe so it would not be so obvious.
Let the glue dry and it will be ready to use!

For more how to details, check out my previous post. You can find it here: Pencil Organizer


Now go make your pencil/pen/supply holder! Hope this inspires you!

Until next time!

Beth


Monday, July 24, 2017

Studio Update 2017

Studio Tour
It has been awhile since I've shown my studio. To be honest, it hasn't been 'comfortably functional' in a while. I say that because I have been very productive in the studio but, it had become overcrowded in there.

Desk Work Space
It is rare to see the top of my desk! This space is used every day so it has a lot of things on it. I am still trying to figure out the best way to get everything up off the desk but still within reach. This arrangement may change up again soon.

When we moved into our house, the studio space was big enough. Over the last 2 years, every square inch has become more and more filled with 'necessities'. Okay, maybe everything is not a necessity, but artists, by nature, tend to keep supplies until they are needed. So those things become 'necessities.

Organized Chaos
As you can see in this 'natural state' collage of the studio, every inch is well used! Especially when I am very busy!

Time to Rearrange
When you trip over cords and you have to move one stack to get to another stack, it is time to reevaluate what needs to stay or go and rearrange the furniture. Also...the cords! What to do with the cords? I've tripped over these many times when in a rush. I will be looking for a solution to this problem.


Work Stations
Because I work with Clay and draw and paint, I need 3 separate spaces that are easy to transition from one to another. Before I rearranged, I had part of my work space in an L shape. In that space, I worked with my wet clay and glazing the fired pieces of clay. But that space became too crowded. So I straightened the work bench and stretched it across the wall with the windows. Storage shelves are easier to get to and the floor space is opened up and I am tripping much less!


Staying Organized
I am not naturally an organized person. I have to work at it. I have to make myself take the time to get organized. I tend to get easily distracted by other things while I am getting organized. But I cannot work when things are unorganized. So I rearrange a lot.
I am also a list maker. I keep lists on this whiteboard that hangs in the studio, along with the notepads that are scattered around the studio. Hanging on the wall beside the whiteboard is my Order Clipboard. This is where I keep track of Etsy Orders. At the end of each month, the completed files go into my business binder.

My organization process is a work in progress. I hope to get my process perfected one of these days. But that is another whole blog post. I would love to hear about ways you get and stay organized. Leave a message below if you have any tips!

Small Spaces
I am thankful to have an extra bedroom that can be used as my studio. This room is small, but it is fine as long as the 'stuff' doesn't take over. I even have a decent size closet in here. It houses even more supplies.

Sometimes I think I want a bigger studio space, but I am sure it would also become filled with 'necessities' too. I will make the most of what I have.

If you are interested in seeing the studio story from the beginning, you can find the links here:
Studio Tour - Part 1
Studio Tour - Part 2
Studio Tour - Part 3 

Until next time!

Beth


Sunday, July 2, 2017

Doodling with Watercolor and Pens

Mixed Media

If you have followed my blog in the past, you would know that most recently, I have spent a lot of time working with clay. My Etsy shop is full of items made of clay. I do love working with clay and creating little houses and ornaments and I plan to continue to make some of those things.

But, I have also written about my experiences with acrylic paint, watercolor, and other drawing materials. Recently I have missed working with two-dimensional materials. More specifically, paint and pens and pencils. As things slow down a little in the summer, I am taking advantage of that time to work more with my painting and drawing materials. I do not know if this will just lead to experimenting with supplies or if I will change directions with my art. I do know that I HAVE to take time to explore my thoughts. I believe that is the best way to stay fresh and continue to learn and evolve in my creative process.

Daily Doodles

In April I decided to commit to the 100 Day Project again. (It's really more like a 6-9 month project for me.) I tried it last year and got about two-thirds of the way through it. But I got very busy in my Etsy shop and just could not keep up the daily commitment. You would think that after that I would remember how difficult it is to do something every day for 100 days. I don't have a problem with working with my art daily. But the challenge is to work both with clay and a painting or drawing medium at the same time. Switching back and forth from 2D to 3D is a huge challenge in itself. It requires a mental switch. Apparently, my switch gets stuck in one position.

Even after my premature end to my project last year, I still wanted to try it again this year. I wanted to create daily doodles. Easy enough right?

No.  Not for me.

I tend to make things complicated for myself. It is a bad habit. I need to learn to tame all of the ideas that run through my brain!

I started with some small square black line doodles.

The idea is to work on something daily for long enough to make it a new routine or habit. It is supposed to be something you can do in a short time period. But I try to make them all perfect and think too much about them. I will say that the more I do, the easier it is for me to relax and not be such a perfectionist.

 I also feel like it should be a collection, therefore they should all be the same size or similar in some way. So I work better in sets. I sit down and work on 3 or 5 at a time. Sometimes more. If I'm in the right frame of mind and creative space, then I really can spend the whole day working on them.

The doodles that I started, at the beginning of the challenge, have evolved from black and white doodles to the color ones that you see here. They do make cute little cards and gift tags. I decided to create little sets of some of these and list them in my Etsy shop. You can find them here: Hand painted name tags  I will be adding more as I work on this challenge.

If you are interested in how I created these little cards, you can read more about it soon on my Art Class Blog here.

Enjoy!


Beth


Sunday, December 25, 2016

Dog Bone Ornaments

Ornament for the Dog Lover

Everyone loves a personalized gift, right?
Everyone loves their dog, right?

 I have been playing around with some custom designs with my dog's name on it, for a year or so. But when I came across a new dog bone cookie cutter, I decided to come up with a design using that for a new ornament. After making a few samples, I listed the Dog Bone with Paw prints, in my Etsy shop. It seemed to be a hit. It was my best-selling ornament in my Etsy shop, this year.

Some Favorites

I just thought that I would share some of my favorites from this year. Some I love because of the color choices and some for their creative dog names.

Enjoy!
And Merry Christmas!

~Beth


Sunday, October 30, 2016

Making Ornaments with Clay

Ornaments

It's that time of year again. It's almost prime Christmas shopping season. I say that because I have been busy making and filling orders for Christmas ornaments for a few weeks now. Each year I add a few new designs and retire a few from the year before. You can shop for my current ornaments in my Etsy shop here: Ornaments

New for 2016


Owl Ornaments are made with a choice of 3 different patterns. 
1. Chevron Pattern   2. Polka Dots     3. Swirl Pattern


Pig Ornaments are made with patterns and patterns with Hog Calls. 
If you are or know a Razorback fan, you know what that means. 
Hog calls include:  1. WooPig    2. Pig Sooie  3. WPS
For non-Hog fans, you can order pigs without the words...just the patterns. 
These can also be ordered to be magnets instead or ornaments.

Also New for 2016

Also new for 2016 is the Personalized Dog Bone Ornament. I wrote about it here: Dog Bone Ornaments   This one will stick around next year. 


Ornaments from 2015
I am still making these ornaments and they are all listed in my Etsy shop. Some of them will be retired after this Holiday Season.


Handmade Ornament Tradition
I like to fill my tree with both handmade ornaments and manufactured ornaments, but the handmade ones are my favorites. What are your favorite type of ornaments on your tree?

Have a great week!


Creating Candy Cane Houses

Candy Cane House When inspiration hits. While making the small fall houses I accidentally left off the chimney on one. I decided to make it ...